


How to Digitize Your Records with Audacity
How to Digitize Your Records with Audacity
Introduction
Remember the days of sitting around listening to records growing up? The sound of the cracking hissing and even the occasional skip. If not that’s ok it is making a comeback even in this digital age we live in. Some of us have old records lying around and want to listen to those great songs that may not be available for digital download or use on our iPod or Android devices and would like to.
How You Do It
Well not to worry, it is easy to do with just a few pieces of hardware and some free software on Linux.
What you need:
- Turntable, can be old style or one of the newer USB turntables
- Phono Pre-Amp (not needed for USB Turntables)
- Audacity
There are many USB models on the market, but many are not made to high standards, but there are a few models out there that are good. A few are
- Audio-Technica AT-LP120-USB $299.99
- Numark PT-01-USB $99.99
- Numark TT250usb $249.99
Turntables are still available for purchase as there is a sort of comeback that records are now enjoying, but you will need a Phono Pre-Amp for connecting a turntable to the computer and boost output to line level and it RIAA equalization. Usually RCA outputs are on the Phono Pre-Amp. There are several models available of which I am using the Rolls VP29 Phono Pre-Amp which was purchased years ago, there are others available such as BBE FJB-200X and ART DJPre II Phono Preamp that are similar to the Rolls.
If you are using a turntable and phono pre-amp you will need to plug into the Line-In jack on your computer, as for USB turntables they connect via USB. In this post we will be using the Numark PT-01-USB turntable for the transfers. Now that we have our hardware lets install the software.
Hardware and Software
We will be using Audacity 2.2 for the software in capturing , cleaning and exporting of the music. For the hardware portion we will be using a Scott belt driven turntable, the Rolls VP29 phono preamp and a Focusrite Scarlett 2i2 USB Interface running on Windows 10 (Note: This will work the same on OSX and Linux).
Roll VP29
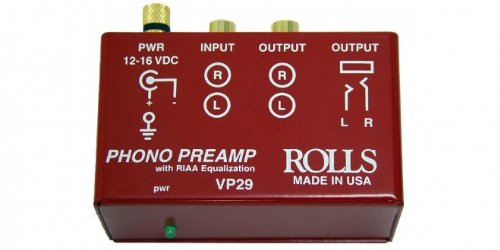
The VP29 is a simple yet integral part of the vintage home audio enthusiast. It’s circuitry is designed not only to provide the RIAA equalization curve, but smooth and quiet operation. It includes RCA inputs and outputs a ground also power brick. It is quiet and works very well.The Rolls VP29 is available at Amazon for $49.00.
Focusrite Scarlett 2i2

Focusrite’s Scarlett 2i2 is a 2 in/2 out USB recording interface featuring two award-winning Focusrite preamps. Housed in an attractive anodized aluminum unibody chassis. The gain interfaces on the Scarlett will light red when the signal starts to clip. The Focusrite Scarlett 2i2 is available for $149.99 at Amazon.
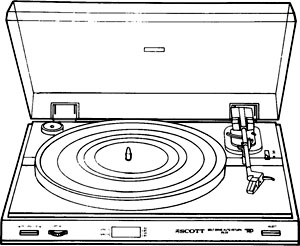
I do not remember when and how long I have had this turntable, but it has been part of my stereo system for a very long time. You can use any turntable you have, this post just uses an older belt drive style.
Also Needed
Dual 1/4 inch TS to Dual RCA Stereo Interconnect Cable (From Rolls to Focusrite Scarlett)
Setup
First step is to hookup all the hardware and install any drivers needed to Focusrite to be seen by the OS. In this case e are using Windows 10, if using Mac OS X no drivers needed. The drivers can be downloaded from the Focusrite site here. Once the drivers have been installed and the OS sees the device it is time to hookup the cables. You will want to plug in the left and right into both of the inputs of the Scarlett from the phono pre-amp and the left and right outputs and ground from the turntable to the pre-amp. You should now be ready to open Audacity. If Audacity is not installed, you can install it from here and install.
Audacity
Audacity can be used to perform all the operations needed to capture, carve up, clean and export to mp3 or ogg format for consumption by your audio device, this is done by using ffmpeg. As of v 2.0 all these features have been included. Installation of Audacity is simple as it is available on most if not all Linux distributions as well as Windows and OS X. For Windows and OS X just go over to the Audacity site and download the packages an install them.
$ sudo dnf install audacity
on Ubuntu
$ sudo apt-get install audacity
Clean your records as well as possible!! The safest method is to use distilled water, and spray it on with a perfectly clean spray bottle. Let it sit for a few minutes and then wipe it off with clean, soft, pure cotton cloth. Don’t do this on the turntable itself, lay the record on a soft cloth on top of a firm flat surface. Any lint from the that gets on the record from the cloth will come off easily with your regular record duster that you will apply while the record is on the turntable and spinning.
There is also the longtime favorite RCA Discwasher which is what I have been using for many years.
Now we are ready to capture the record using Audacity.
Setting Levels
It is very important to set the levels coming into Audacity, this is to insure that no redlining will occur and cause distortion to you transfer. We can always use filters to increase and normalize once in Audacity, but distortion is harder to remove.
Open Audacity and set the input to what your turntable is connected by to your system. Since I am using a USB turntable the choice is USB Audio Codec.

Next start up the turntable and lets set the levels. Click on the Click to Start Monitoring and using the OS’s settings or if your USB Turntable has a Gain you can make changes there. The goal is to keep the peaks out of the red. Our target is keep it below zero. Once you are happy with the settings it is time to start recording.

Capture
Click on the record button and restart your record. At this point enjoy the music and patiently wait for the end of the first side. When you get there press the pause button and flip the record. Un-pause (click on the pause button) and start playing the second side until all is captured. When you are done press stop. Congratulations you record is now digital and ready to manipulate.
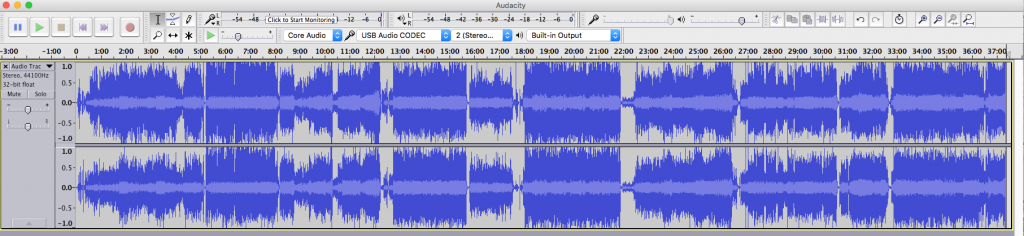
To see it all in one window like above click View > Fit in Window.
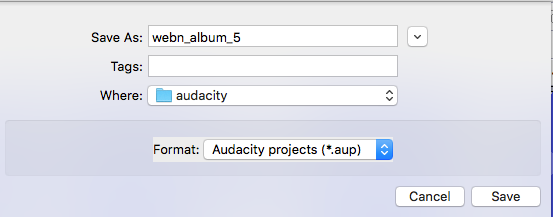
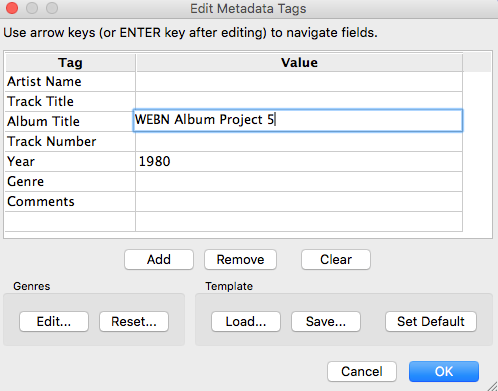
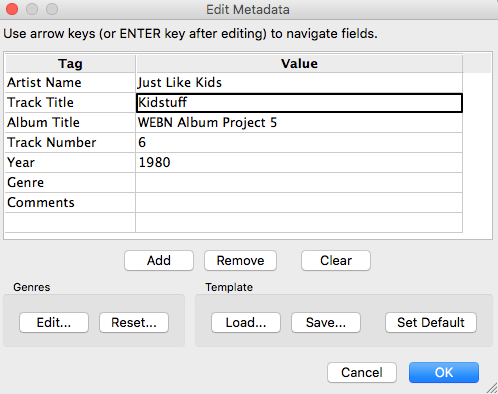
Lets save our capture as a project and set some metadata. Click File > Save Project As and give it a name. So now lets set some metadata with album name and year to have as a common when we export the data. Click File > Edit Metadata. Enter in Album and Year for now. The track name and artist info will be added at export from labels we are going to add.
Adding labels
Now let’s add labels. The reason we are doing this is to mark where each of the songs start so when we export Audacity knows were and what to name each track. Move the cursor to where you want the break and click Track > Add Label at Selection. Type in a name and move to the next one. Once you are done it should look similar to this.
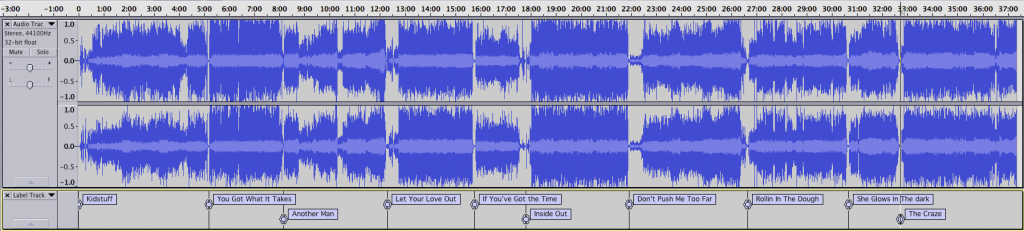
Save your project to not lose any changes you have made.
Exporting
All the hard work has been done and now it is time to export. Which brings many questions. What is the target? CD (WAV), MP3, FLAC? What bitrate? So many questions and so many option s we have at our disposal.
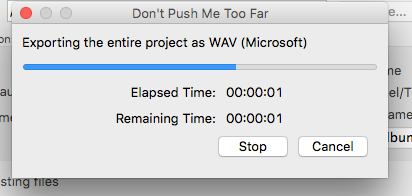
If we are wanting to make a playable CD we will need to export all as WAV format. Click Edit > Select > All or click in the left pane in a blank area. Click File > Export Multiple. Change Export Format to WAV and click Export.
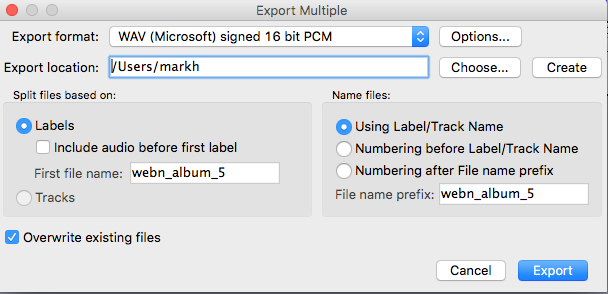
You will receive popups for each of the songs for you to add more metadata, the data you entered earlier will be there. Just fill in the blanks and click OK.
Once the final one is done Audacity will start exporting.
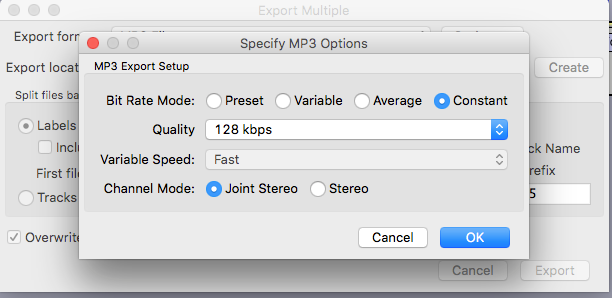
At this point you can use your favorite burning program to create a CD. But how about you want to listen on your phone, iPod or computer. For that you can export MP3, FLAC, OGG Vorbis format and many others. The process is exactly the same, just change the export format. You will also get options for bit rates and quality. Click on Options next to export format. Note: FLAC is support on OSX by downloading nd installting FLAC support, best option is to convert to ALAC (Apple Losless Audio Codec) using ffmpeg or other available tools.
MP3 Options
FLAC File Options

Conclusion
So we have gone through the process on how to digitize your records using Audacity. Have fun bringing back those old memories and great music! Look for future posts on Cleaning up in Audacity as well as transferring other media using Audacity.


Leave a Reply