How To Install WordPress on Fedora 20
Introduction
WordPress is a free and open source website and blogging tool that uses PHP and MySQL. WordPress is currently is a CMS (Content Management System. It is easy to setup websites and customize.
In this guide, we will demonstrate how to get a WordPress instance set up with an Apache web server, PHP and MariaDB on Fedora 20.
Prerequisites
Before we can install and configure WordPress we must first install what is reffered to as LAMP (Linux, Apache, MySQL, PHP).
Open a terminal and type
$ sudo yum install mariadb-server mariadb httpd php php-mysqlnb
Now that the installation is complete let’s start and set mariadb and Apache to start on reboot.
First let’s set the service to start at start.
$ sudo systemctl enable mariadb.service
$ sudo systemctl enable httpd.service
Now let’s start them up
$ sudo systemctl start mariadb.service
$ sudo systemctl start httpd.service
Now that MySQL database is running, we want to run a simple security script that will lock down access to the database system. Start the interactive script by running:
$ sudo mysql_secure_installation
The prompt will ask you for your current root password. Since you just installed MySQL, you most likely won’t have one, so leave it blank by pressing enter. Then the prompt will ask you if you want to set a root password. Go ahead and enter Y, and follow the instructions:
Enter current password for root (enter for none):
OK, successfully used password, moving on…
Setting the root password ensures that nobody can log into the MariaDB
root user without the proper authorization.
New password: mypassword
Re-enter new password: mypassword
Password updated successfully!
Reloading privilege tables..
… Success!
For the rest of the questions, you should simply hit the “ENTER” key through each prompt to accept the default values. This will remove some sample users and databases, disable remote root logins, and load these new rules so that MySQL immediately respects the changes we have made.
Now that we have the basic’s out of the way we can download and install the latest version of WordPress.
Create Mariadb Database for WordPress
WordPress uses a relational database to manage information for the site and its users. We have MariaDB installed already, which can provide this functionality, but we need to make a database and a user for WordPress to work with.
To get started, log into MySQL’s root (administrative) account by issuing this command:
mysql -u root -p
You will be prompted for the password that you set for the root account when you installed MySQL. Once that password is submitted, you will be given a MySQL command prompt.
$ mysql -u root -p
Enter password:
Welcome to the MariaDB monitor. Commands end with ; or \g.
Your MariaDB connection id is 11
Server version: 5.5.40-MariaDB MariaDB Server
Copyright (c) 2000, 2014, Oracle, Monty Program Ab and others.
Type ‘help;’ or ‘\h’ for help. Type ‘\c’ to clear the current input statement.
MariaDB [(none)]>
First, we’ll create a new database that WordPress can control. You can call this whatever you would like, but I will be calling it wordpress for this example.
Next, we are going to create a new MySQL user account that we will use to operate on WordPress’s new database.
For this example we will call the new account wpuser and will assign it a password of password. You should definitely use a different username and password, as these examples are not very secure.
CREATE USER wpuser@localhost IDENTIFIED BY ‘password’;
At this point, you have a database and user account that are each specifically made for WordPress. However, the user has no access to the database. We need to link the two components together by granting our user access to the database.
GRANT ALL PRIVILEGES ON wordpress.* TO wpuser@localhost IDENTIFIED BY ‘password’;
Now that the user has access to the database, we need to flush the privileges so that MySQL knows about the recent privilege changes that we’ve made:
FLUSH PRIVILEGES;
Once these commands have all been executed, we can exit out of the MySQL command prompt by typing:
exit
You should now be back to your regular SSH command prompt.
Install WordPress
Before we download WordPress, there is one PHP module that we need to install to ensure that it works properly. Without this module, WordPress will not be able to resize images to create thumbnails. We can get that package directly from the default repository.
$ sudo yum install php-gd
Now we need to restart Apache so that it recognizes the new module:
$ sudo systemctl restart httpd.service
We are now ready to download and install WordPress from the project’s website. Luckily, the WordPress team always links the most recent stable version of their software to the same URL, so we can get the most up-to-date version of WordPress by typing this:
$ cd /var/www/html
$ sudo wget http://wordpress.org/latest.tar.gz
This will download a compressed archive file that contains all of the WordPress files that we need. We can extract the archived files to rebuild the WordPress directory with tar:
$ sudo tar xzvf latest.tar.gz
Now we still need to add a folder for WordPress to store uploaded files. We can do that with the mkdir command:
$ sudo mkdir /var/www/html/wordpress/wp-content/uploads
Now we need to assign the correct ownership and permissions to our WordPress files and folders. This will increase security while still allowing WordPress to function as intended. To do this, we’ll use chown to grant ownership to Apache’s user and group:
$ sudo chown -R apache:apache /var/www/html/*
With this change, the web server will be able to create and modify WordPress files, and will also allow us to upload content to the server.
Configure WordPress
Most of the configuration required to use WordPress will be completed through a web interface later on. However, we need to do some work from the command line to ensure that WordPress can connect to the MySQL database that we created for it.
Begin by moving into the Apache root directory where you installed WordPress:
$ cd /var/www/html/wordpress
The main configuration file that WordPress relies on is called wp-config.php. A sample configuration file that mostly matches the settings we need is included by default. All we have to do is copy it to the default configuration file location, so that WordPress can recognize and use the file:
$ sudo cp wp-config-sample.php wp-config.php
Now that we have a configuration file to work with, let’s open it in a text editor:
$ sudo vi wp-config.php
The only modifications we need to make to this file are to the parameters that hold our database information. We will need to find the section titled MySQL settings and change the DB_NAME, DB_USER, and DB_PASSWORD variables in order for WordPress to correctly connect and authenticate to the database that we created.
Fill in the values of these parameters with the information for the database that you created. It should look like this:
// ** MySQL settings – You can get this info from your web host ** //
/** The name of the database for WordPress */
define(‘DB_NAME’, ‘wordpress’);
/** MySQL database username */
define(‘DB_USER’, ‘wpuser’);
/** MySQL database password */
define(‘DB_PASSWORD’, ‘password’);
These are the only values that you need to change, so save and close the file when you are finished.
Complete Installation
Now that you have your files in place and your software is configured, you can complete the WordPress installation through the web interface. In your web browser, navigate to your server’s domain name or public IP address:
http://server_name_or_IP/wordpress
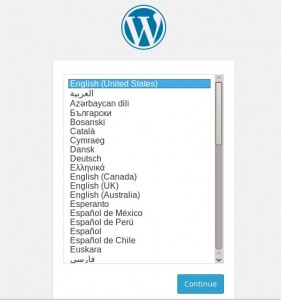
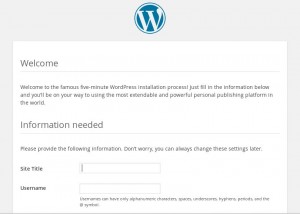
First, you will need to select the language that you would like to install WordPress with. After selecting a language and clicking on Continue, you will be presented with the WordPress initial configuration page, where you will create an initial administrator account:
After selecting a language and clicking on Continue, you will be presented with the WordPress initial configuration page, where you will create an initial administrator account:
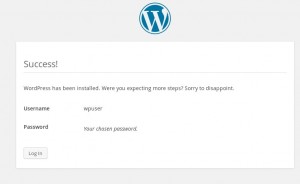
Enter in the information requested and click Install WordPress. Once the installation is completed you will be sent to a screen to login.
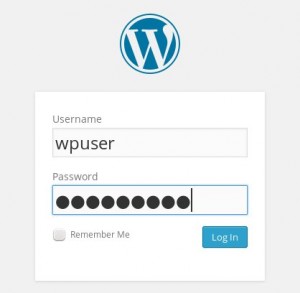
Click Login and you will be redirected once again.
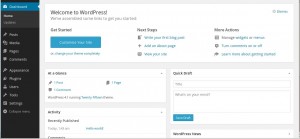
After hitting Log in, you will be presented with your new WordPress dashboard.
Conclusion
You should now have a WordPress instance up and running on your Fedora 20 system.




Nice tutorial. Are there any advantages when using the manual installation of wordpress instead of the packaged version (dnf install wordpress)? Also you did not mention selinux permissions for the wordpress directory.