


Reading HFS+ formatted disks on Windows 7

Introduction
Ran into a challenge the other day in retrieving data off a crashed Macbook Pro system which is formatted in HFS+. Currently I have a very old iBook that I have used in the past, but it has lived it’s very useful life. So I had to find another way to access the data off the drive.
I knew there was a way to accomplish this in Windows so I started searching around for a Windows solution, Low and behold I found one in HFSExplorer http://www.catacombae.org/hfsexplorer/.
What is HFSExplorer?
HFSExplorer is an application that can read Mac-formatted hard disks and disk images.
It can read the file systems HFS (Mac OS Standard), HFS+ (Mac OS Extended) and HFSX (Mac OS Extended with case sensitive file names).
HFSExplorer allows you to browse your Mac volumes with a graphical file system browser, extract files (copy to hard disk), view detailed information about the volume and create disk images from the volume.
HFSExplorer can also read most .dmg disk images created on a Mac, including zlib / bzip2 compressed images and AES-128 encrypted images. It supports the partition schemes Master Boot Record, GUID Partition Table and Apple Partition Map natively.
Step 1 – Download and Install
With that said let’s download and try it out. Download HFSExplorer from here. Once downloaded extract the zip and double-click to start the installation. Accept the defaults and the installation should be painless.
Step 2 – Mount Drive and get data
Now let’s get that data. Plug the drive in using a SATA connector. Since the program was installed Windows will find new hardware and install the needed driver.
Open up HFSExplorer in Administrator mode. The installation will put a shortcut for just this purpose in your start menu.
We will now see the HFSExplorer interface.

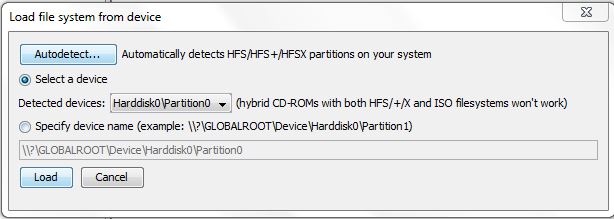
Next plug in the HFS disk using a Sata to USB device. Click File > Load filesystem from device. and you will see that it has detected the drive that was just plugged in. In the dropdown of the detected devices you may have to select different devices until it loads the HFS plus filesystem. Click Load.
HFSExplorer will now display th contents of the drive.
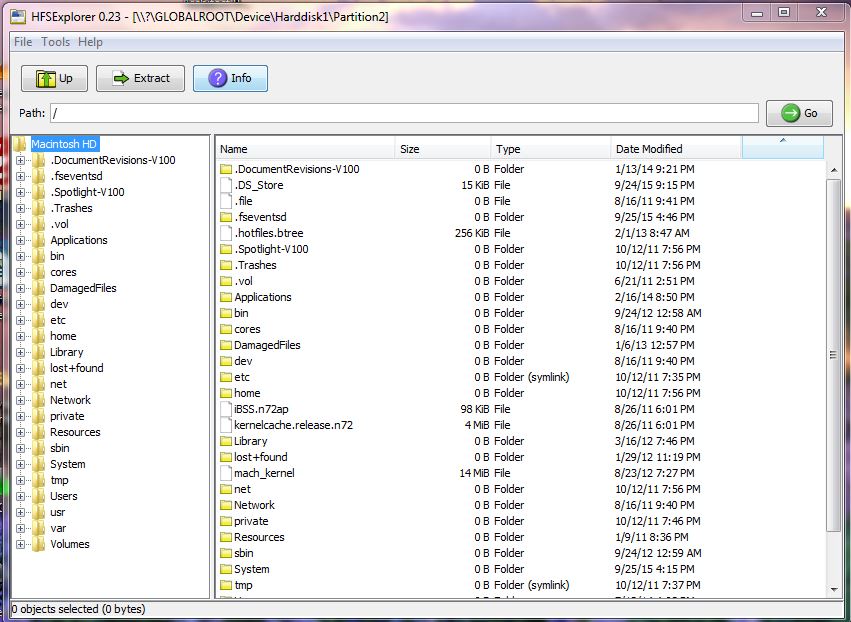
At this point you can now get to the files and extract them to the hard drive of the Windows system. Just right click on a file or directory and Select extract data. A dialog box will popup asking where to save the files to, select or create and click ok.
Conclusion
As we can see it is possible to retrieve data from HFS+ formatted disks on a Windows system using HFSExplorer.


Leave a Reply