


Network performance with VMXNET3 on Windows Server 2012 R2

Introduction
In this post we will cover an updated version for addressing VMXNET3 performance issues on Windows Server 2012 R2. As with an earlier post we addressed Windows Server 2008 R2 but, with 2012 R2 more features were added and old settings are not all applicable.
What To Change
According to VMWare you may experience issues similar to:
- Poor performance
- Packet loss
- Network latency
- Slow data transfer
The issue may be caused by Windows TCP Stack offloading the usage of the network interface to the CPU.
To resolve this issue, disable the several features that are not supported by VMXNET3 driver.
First lets disable TCP chimney, AutoTuning, Congestion Provider, Task Offloading and ECN Capability.
Open the command prompt as administrator and run these commands:
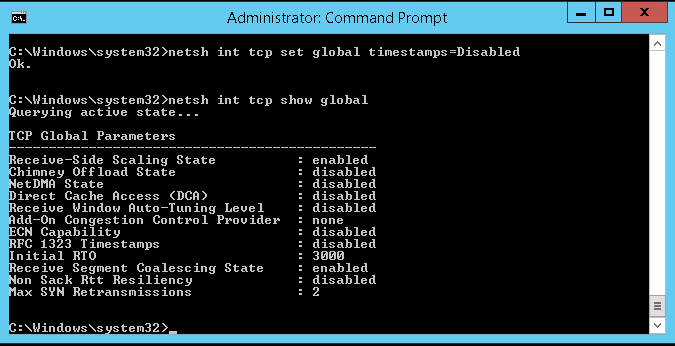
netsh int tcp set global chimney=Disabled
netsh int tcp set global autotuninglevel=Disabled
netsh int tcp set supplemental custom congestionprovider=none
netsh int tcp set global ecncapability=Disabled
netsh int ip set global taskoffload=disabled
netsh int tcp set global timestamps=Disabled
To validate type:
netsh int tcp show global
Next we will need to turn on RSS feature on the VMXNET3 driver. To do this open the network connections and adapter settings.
From GUI.
Open Control Panel > Network and Internet > Network Connections. Right click on your adapter and select properties.
Click on the Advanced tab and scroll down to find the Receive Side Scaling setting, you will see by default it is set to disabled. Set the drop down to enabled and click ok to save the settings.
Form the command line.
netsh int tcp set global RSS=Enable
There are some additional settings that will also cause performance issues. Here is what they are and how to make the needed changes.
Receive Segment Coalescing (RSC)
RSC is a stateless offload technology that helps reduce CPU utilization for network processing on the receive side by offloading tasks from the CPU to an RSC-capable network adapter. CPU saturation due to networking-related processing can limit server scalability. This problem in turn reduces the transaction rate, raw throughput, and efficiency.
This is similar to TCP Offloading issue and it is recommended to set this to disabled.
To disable RSC on the virtual machine, perform one of these options:
Use the PowerShell command Disable-NetAdapterRsc.
To disable for all interfaces:
Disable-NetAdapterRsc *
To disable for a specific interface:
Disable-NetAdapterRsc -Name Ethernetx
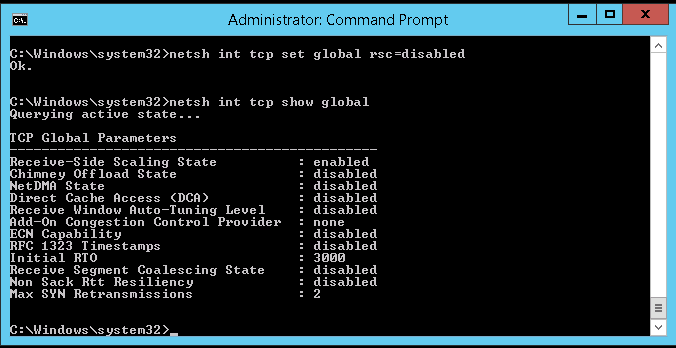
Disable RSC globally using the command line
netsh int tcp set global rsc=disabled
From the GUI.
In the Network and Sharing Center of the guest operating system’s Control Panel, click the name of the network adapter.
A dialog box displays the status of the adapter.
Click Properties, and under the VMXNET3 network adapter type, click Configure.
On the Advanced tab, set both Recv Segment Coalescing (IPv4) and Recv Segment Coalescing (IPv6) to Enabled or Disabled.
Click OK.
To verify that RSC is disabled on the virtual machine:
Use the PoweShell command Get-NetAdapterRsc. The IPv4OperationalState and IPv6OperationalState should both be set to FALSE.
Use the netsh int tcp show global command. The Receive Segment Coalescing State should be set to disabled.
Reference:
Large Send Offload V2 (IPV4) & Large Send Offload V2 (IPV6)
Is a feature on modern Ethernet adapters that allows the TCP\IP network stack to build a large TCP message of up to 64KB in length before sending to the Ethernet adapter. Then the hardware on the Ethernet adapter — what I’ll call the LSO engine — segments it into smaller data packets (known as “frames” in Ethernet terminology) that can be sent over the wire. This is up to 1500 bytes for standard Ethernet frames and up to 9000 bytes for jumbo Ethernet frames. In return, this frees up the server CPU from having to handle segmenting large TCP messages into smaller packets that will fit inside the supported frame size.
Disable with PowerShell
Set-NetAdapterAdvancedProperty Ethernet -DisplayName "Large Send Offload V2 (IPv4)" -DisplayValue "Disabled" -NoRestart

Set-NetAdapterAdvancedProperty Ethernet -DisplayName "Large Send Offload V2 (IPv6)" -DisplayValue "Disabled" -NoRestart
From the GUI.
In the Network and Sharing Center on the Windows control panel, click the name of the network adapter.
Click its name.
A dialog box displays the status of the adapter.
Click Properties, and beneath the network adapter type, click Configure.
On the Advanced tab, set the Large Send Offload V2 (IPv4) and Large Send Offload V2 (IPv6) properties to Enabled or Disabled.
Click OK.
Restart the virtual machine.

Reference
TCP Segmentation Offload
TSO is used to offload packet processing from the CPU to the NIC. Disabled is the preferred setting.
From the GUI.
In the Network and Sharing Center on the Windows control panel, click the name of the network adapter.
Click its name.
A dialog box displays the status of the adapter.
Click Properties, and beneath the network adapter type, click Configure.
Click on the Advanced tab under the NIC properties and set the following attributes’ values to Disabled:
- IPv4 Checksum Offload
- IPv4 TSO Offload
- Large Send Offload V2 (IPV4)
- Large Send Offload V2 (IPV6)
- Offload IP Options
- Offload tagged traffic
- Offload TCP Options
- Recv Segment Coalescing(IPV4)
- Recv Segment Coalescing(IPV6)
- TCP Checksum Offload (IPv4)
- TCP Checksum Offload (IPv6)
- UDP Checksum Offload(IPv4)
- UDP Checksum Offload(IPv6)
Using PowerShell
Set-NetAdapterAdvancedProperty Ethernet -DisplayName ” IPv4 Checksum Offload ” -DisplayValue “Disabled” -NoRestart
Set-NetAdapterAdvancedProperty Ethernet -DisplayName ” IPv4 TSO Offload ” -DisplayValue “Disabled” –NoRestart
Set-NetAdapterAdvancedProperty Ethernet -DisplayName “Large Send Offload V2 (IPv4)” -DisplayValue “Disabled” -NoRestart
Set-NetAdapterAdvancedProperty Ethernet -DisplayName “Large Send Offload V2 (IPv6)” -DisplayValue “Disabled” –NoRestart
Set-NetAdapterAdvancedProperty Ethernet -DisplayName ” Offload IP Options ” -DisplayValue “Disabled” -NoRestart
Set-NetAdapterAdvancedProperty Ethernet -DisplayName ” Offload tagged traffic ” -DisplayValue “Disabled” –NoRestart
Set-NetAdapterAdvancedProperty Ethernet -DisplayName ” Offload TCP Options ” -DisplayValue “Disabled” -NoRestart
Set-NetAdapterAdvancedProperty Ethernet -DisplayName ” Recv Segment Coalescing(IPV4)” -DisplayValue “Disabled” –NoRestart
Set-NetAdapterAdvancedProperty Ethernet -DisplayName ” Recv Segment Coalescing(IPV6)” -DisplayValue “Disabled” -NoRestart
Set-NetAdapterAdvancedProperty Ethernet -DisplayName ” TCP Checksum Offload (IPv4)” -DisplayValue “Disabled” –NoRestart
Set-NetAdapterAdvancedProperty Ethernet -DisplayName ” TCP Checksum Offload (IPv6)” -DisplayValue “Disabled” -NoRestart
Set-NetAdapterAdvancedProperty Ethernet -DisplayName ” UDP Checksum Offload(IPv4)” -DisplayValue “Disabled” –NoRestart
Set-NetAdapterAdvancedProperty Ethernet -DisplayName ” UDP Checksum Offload(IPv6)” -DisplayValue “Disabled” -NoRestart
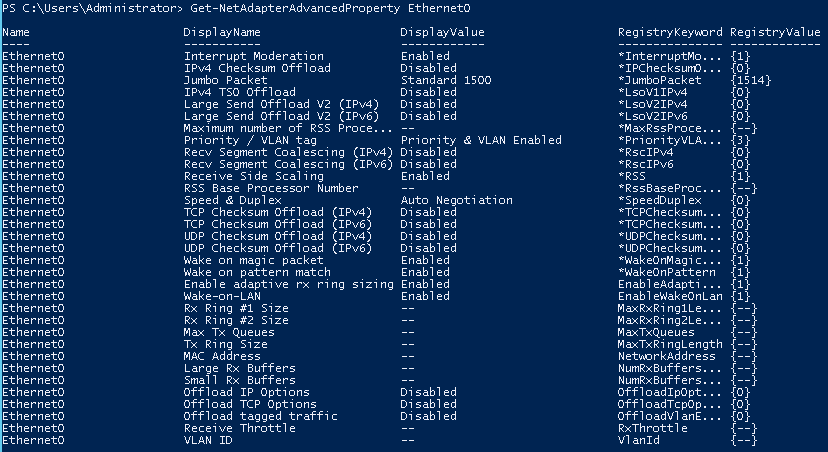
See results using Get-NetAdapterAdvancedProperty Ethernet
Reboot your system for the changes to go into effect.
Power plan
To ensure that the system takes advantage of the available resources, it is important to disable all power saving features while investigating performance issues. If the power saving configuration appears to be related to the performance problems, a customized power plan based on the performance and power saving requirements should be created. If you are unsure about which power saving configuration is recommended for your system, engage your hardware vendor.
To adjust the power plan settings on a Windows 2012 R2 Server:
Click Start, type powercfg.cpl, and press Enter.
Ensure that the High performance option is selected.
Note: The Steps are optional.
Click Change plan settings.
Click Change advanced power settings.
To enable access to all settings, click Change settings that are currently unavailable.
Browse the available settings and adjust as necessary.
Click OK to confirm and close all windows.
References
Conclusion
There are several more options available to address performance issues with Windows Server 2012 R2 using VMXNET3 drivers from Windows Server 2008 R2 that we have covered in this post. Changing these settings should help address many of these issues.
Related Posts:


16 Responses to “Network performance with VMXNET3 on Windows Server 2012 R2”
Trackbacks/Pingbacks
- VMWARE VMXNET3 Performance für Windows Server 2012 R2 optimieren - flatbox the blog - […] Network performance with VMXNET3 on Windows Server 2012 R2 […]
- En Windows, der blev alt for virtuel… | Systemconnects Teknikblog - […] Network performance with VMXNET3 on Windows Server 2012 R2 […]


Tony thanks for the sharing !
Found a few issues with the post. syntax change and other PowerShell Net settings added.
Thanks for sharing. I have tried to do these settings, but the file transfer is still dropping. Any clue ?
Thanks for posting, we are using these settings in our deployments. Any thoughts on Win 2016 yet? 🙂
I have not had a chance to look at 2016 yet, just got my hands on an eval copy should be looking soon.
Nice!
Hi Mark,
thanks for sharing this to us. This helped me to solve several problems with network intense applications. You said that there are some other optimizations for the vmxnet adapter ….can you share these as well ?
thanks in advance
Hardy
I mistated in the conclusion section. I have updated the statement. It should say There are several more options available to address performance issues with Windows Server 2012 R2 using VMXNET3 drivers from Windows Server 2008 R2 that we have covered in this post. I am glad the settings helped resolve any issues you were having. Stay tuned I am working on a Windows Server 2016 VMXNET3 settings post as well.
Is all this still necessary if you have ESXi 6 update 2 or 3 on the server?
Disabling TCP Receive Window Auto-Tuning is NOT a good idea, this will prevent TCP window scaling causing very poor throughput. TCP throughput = window size / latency , by disabling window scaling the max window size is 65,535 bytes, I’ve seen TCP windows scale up to 1MB, here’s some calculations as an example, both with 30 ms latency but one with a non-scaled window ( 64KB ) and the other with a 1MB window.
maximum throughput with a TCP window of 64 KByte and RTT of 30.0 ms <= 17.48 Mbit/sec.
maximum throughput with a TCP window of 1000 KByte and RTT of 80.0 ms <= 102.40 Mbit/sec.
Are these applicable to WS2012 aswell?
Please note that Receive Side Scaling NEEDS VMware tools 10.1.7. Because of an issue.
https://kb.vmware.com/s/article/2149587
Have you done any performance tests with each of these settings on & off? I see lots of people posting references to these settings, and many referring back here, but I can’t tell if they’ve been tested or are just assumptions made because of issues with one or more of these settings.
For server 2012 R2 these were tested as well as validated by the different online resources to what the changes would impact and what it would do. We did see improvement when the changes were implemented.
Has anyone tested performance *without* disabling these RSS/RSC settings using newer vmTools? Or more accurately, the newer vmxnet3 driver 1.7.3.8 bundled with 10.2.5 vmTools OR the vmxnet3 driver 1.8.3.1 bundled with 10.3.2 vmTools to see if the default OS/driver settings still have the performance issue? I believe if you UPGRADE vmTools it will keep your existing vmxnet3 driver settings, not revert to out of box defaults.
Does anyone have a link to Vmware specifying these features on not supported on VMXNET3? The reference above just takes you to the main Vmware Vsphere documentation page. Also not anywhere in the curriculum I studied for the VCP certification.