How install Apache 2.4 PHP 7.1 and MySQL 5.7.18 on Windows Server 2016
Introduction
This post is a how to guide for installing Apache, PHP and MySQL on the latest release. In this post like previous we will cover installing all the programs individually. This will cover installing 64 bit versions of the programs.
Apache 2.4 Install
First download Apache 2.4 from http://www.apachelounge.com/download/ (httpd-2.4.25-win64-VC14.zip) Apache 2.4.25 VC14
This release is supported by the PHP 7.1.6 install from windows.php.net for Apache 2.4.
Extract the zip copy Apache24 to the root of C:\. This will be C:\Apache24 when it is all done.
Microsoft Visual C++ 2015 Runtime
Download and install Microsoft Visual C++ VS 2015 x64 from https://support.microsoft.com/en-us/help/2977003/the-latest-supported-visual-c-downloads this is required for Apache to run.
PHP 7 and higher
Download php-7.1.6-Win32-VC14-x64 (thread safe) from http://windows.php.net/download/ . Extract and rename folder to php and move to C:\.
Edit Apache’s config file, c:\Apache24\conf\httpd.conf and add the following lines to the bottom of the file.
LoadModule php7_module "c:/php/php7apache2_4.dll"
AddHandler application/x-httpd-php .php
# configure the path to php.ini
PHPIniDir "C:/php"
While we are at it we can add index.php to Apache’s list just incase we want to have a starting page as php.
Find Directory index and add index.php
DirectoryIndex index.html index.php
Save the file changes. Next we need to register the path where the applications reside. This is done by editing the PATH variable.
Add
;c:\php;c:\Apache24;c:\Apache24\bin
to PATH in Environment variables. PATH ENVIRONMENT (Control Panel | System Properties | Advanced | Environment Variables | System variables | Path).
Example:
;c:\php;c:\apache24;c:\apache24\bin;
We can also set this from the command prompt.
setx PATH “%PATH%;c:\php;c:\apache24;c:\apache24\bin” /M
Save and reboot the system.
Next we need to input a value for ServerName variable. You will have to un-comment it. Save the changes to the config file. Next move to the Register Apache Service step.
Register Apache Service
Now let’s register Apache as a service. Open a command prompt and type.
c:\apache24\bin\httpd -k install
If do not want Apache starting automatically at start-up/reboot:
Command line
C:\> sc config Apache2.4 start= demand
Now lets check Apache settings by issuing the command,
c:\Apache24\bin\httpd -S
At this point we can start Apache service and open a web browser and go to localhost and get the Apache It Works! page.
PHP Edits
Now we have to do a few edits to the php.ini file to tell it to load support for mysql and the location for the extensions. Since there is not a already set php.ini file we need to rename one of the two examples to php.ini.
Rename c:\php\php.ini-development to php.ini
Now let’s edit php.ini
Uncomment extension directory.
; Directory in which the loadable extensions (modules) reside.
; http://php.net/extension-dir
; extension_dir = "./"
; On windows:
extension_dir = "ext"

Uncomment mysql modules
extension=php_mysqli.dll
Save the changes and open a command prompt. Check to make sure it shows loaded modules.
C:\> php -m
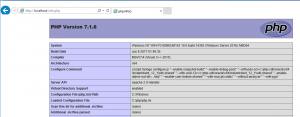
So now we have Apache running and configured to use php. Lets create a file called info.php, save it and see if Apache parses the info correctly to display the results.
Open Notepad or your favorite Windows editor and type and save the following.
<?php
phpinfo();
?>
Open your browser and type, localhost/info.php for the location and you should receive alot of information about PHP.
MySQL
Download mysql-installer-community-5.7.18.1.msi. You will also need to install Microsoft Visual C++ VS 2015 x64 from https://www.microsoft.com/en-us/download/details.aspx?id=48145 and Microsoft Visual C++ VS 2013 x64 install first.
Once the installation is completed you can let the configuration wizard run and setup the database server. The defaults will work just fine, but remember what you set the password to for root and create a local user.
At this point you should have a working Apache / PHP / MySQL installation running and ready for you to use!
5 Responses to “How install Apache 2.4 PHP 7.1 and MySQL 5.7.18 on Windows Server 2016”
Trackbacks/Pingbacks
- Laravel on Windows cannot use MySQL – IlluminateDatabaseQueryException: could not find driver (SQL: select [duplicate] – Mysql Questions - […] the advise in this helpful post I editing my php.ini by uncommenting the following […]


Brilliant!
This saved me a lot of time.
So helpful. Thank you!
Hi
What should i add at the bottom of httpd.conf file if i download httpd-2.4.29-Win64-VC15 version. Can you please guide me.
Thanks a lot
There should be no difference to the changes to the httpd.conf file from what is listed in the post, not sure what you are looking for.
Good day, this tutorial is compatible with Windows server 2012 r2 or I need to change something?
Thank you for you answer and congratulations for your work.
This just worked perfectly with MySQL 8.0 and PHP 7.4.9 on Windows Server Essentials 2016. Thank you very much.