


How To Install Reaper on Ubuntu Studio 20.04

How To Install Reaper on Ubuntu Studio 20.04
Introduction
So, it’s been awhile since I have played around with Ubuntu Studio and I have always like the distribution in the way it is packaged and the realtime kernel for Audio, Video and Graphics tasks. One of my favorite DAW (Digital Audio Workstation) is Reaper. In the past to run Reaper you had to use WINE or other methods but as luck would have it they have been releasing a version for Linux so I thought would give it a try.
Note:
REAPER, fully featured with no artificial limitations. You can evaluate REAPER in full for 60 days. A REAPER license is affordably priced and DRM-free.
For the post I am using Ubuntu Studio 20.04 running on an Intel Core 2 Duo with 8 GB RAM, 250 GB SSD and 1 TB SAS HD with an Nvidia GT610 graphics card. Nothing fancy but good enough for medium Audio and Video production. For the installation directory we will be using ~/reaper (~ is your home directory).
Installation of Reaper
First we need to download Reaper from http://reaper.fm/download.php#linux_download select the x86_64 bit version. At the time of this post the release is 6.09.
Extract the downloaded file to ~/reaper which will create the reaper_linux_x86_64 sub directory. Open a terminal session and change to ~/reaper directory. There are a few requirements for Reaper.
Requirements
- libc6, libstdc++ for gcc 4.x or later
- libgdk-3 (you can also target headless or libgdk-2 if you build your own libSwell from WDL, see below)
- ALSA
First let’s address the first bullet point for the requirements for libc6, libstdc++. From the terminal type:
$ sudo apt-get install build-essential libgtk-3-dev git
Once the installation is done we can now tackle the libSwell requirement. We do this by downloading from the Cockos GIT repository and running make.
$ git clone http://www-dev.cockos.com/wdl/WDL.git WDL/

$ cd WDL/WDL/swell
At this point we are ready to run make. There are several options you can pass but for this instance we are just taking the defaults.
$ make
If all goes well you should see libSwell.so and several other files in the directory.
Next step is to create a link for Reaper to find the library.
$ ln -sf `pwd`/libSwell.so ~/reaper/reaper_linux_x86_64/REAPER/libSwell.so
You can run REAPER directly from the extracted directory by navigating to REAPER/ and run “./reaper”.
If you would like to install REAPER to your system (either globally in /opt, or in ~/opt) and/or integrate with the desktop environment, you can run the included “install-reaper.sh” script from the terminal. It will offer you choices on how to proceed. If you choose to install REAPER, the script will also generate an uninstall script in order to remove it at a later date. For my preference I already have Reaper where I want it so we will choose to integrate with the desktop option.
From the terminal in the ~/reaper/reaper_linux_x86_64 directory execute ./install_reaper.sh
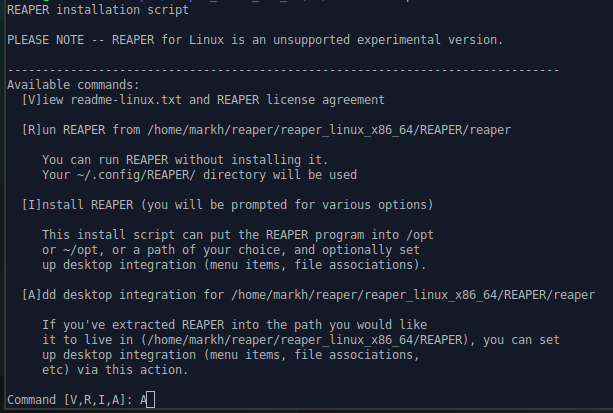
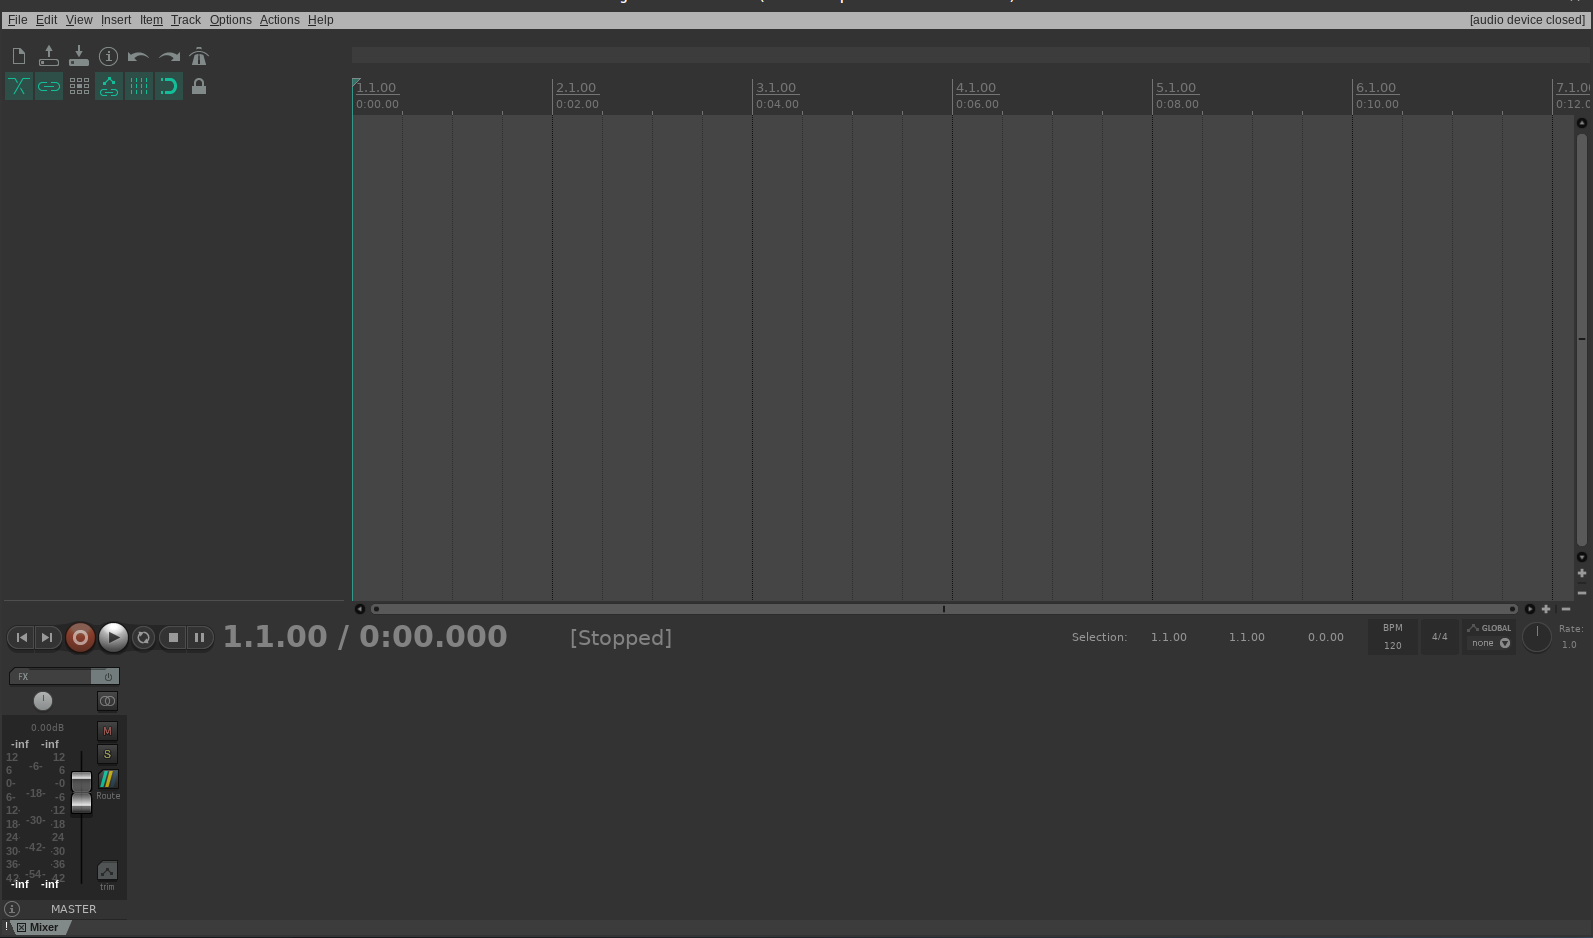
Select Option “A” and press enter. Once the script has run a shortcut will appear under Audio Production menu in Ubuntu Studio. Click on it and you are presented with the Reaper interface.
Conclusion
I hopes this helps you to enjoy using Reaper on your Ubuntu / Ubuntu Studio installation. Happy Recording!


Any tips on how to uninstall reaper? I am having issues uninstalling it.
You can try with qUninstaller.
The shortcut of reaper is appear under Audio
ADVERTISEMENT Production but it doesn’t work!
Hi, I follow the procedure, at the end I run the shortcut under Audio Production but no reaper interface starts. Can you help me?
Enrico, I just did fresh install for 6.15 for Linux without downloading libSwell. New version of Reaper includes it so not needed. Followed the steps in the;posting and no issues. Shortcut created in Audio Production. Only error I had was Reaper complain was no audio interface which is normal at startup. You have to plug in and define it, which sounds like what you are seeing. Under Options > Preferences you can set the Audio device. Since this is Linux you will want to do that using JACK.
Is it possible to run reaper on linux headless? In other words, on the command line I want to run reaper, with no GUI, give it a midi file and make it use a VSTi or two, and it produces an audio file written to the file system. I am using Ubuntu Groovy Gorilla.
it isn’t working guys…
bash: /home/nik/reaper/reaper_linux_aarch64/REAPER/reaper: cannot execute binary file: Exec format error
Hi, just an update on my previous comment. I went to the older versions page and downloaded the previous version for x86_64 architecture and it worked.
Glad to hear you found a solution
Hello there, I like this thread.
Not good at all using the CLI, but I love using ubuntu, now I have ubuntu studio.
Am just retired, and now picking up the guitar again, and want to try some new stuff, like recording.
I have used reaper on win10, but ditching all of windows 9not at work anymore) and to try to get my UMC22 run in linux.
I do not know how to download, extract, set up a directory,….. but I am good at following instructions.
It it pleases someone, I would appreciate a line by line episode of installing reaper to ubuntu studio. thank you in advance, regards, David
It work perfectly for me at first try! Awesome! As I have a behringer interface I’m using ASLA Codec audio and it work with minimal latency.
the instal worked flawlessly on Ubuntu 20.04
however on my 4K monitor the menus are not readable.
is there a way to make the menu text bigger?
and some of the controls texts as well.
I finally got it running on Ubuntu 22.04 but I’m using PreSonus USB96 and having trouble connecting. I also have a Win10 machine and got Reaper running on that via ASIO. I wonder if there is an ASIO driver for Ubuntu ?
Gren, Check to make sure Ubuntu see’s it first by running sudo dmesg. According to Presonus and some of the forums it doesn’t need drivers. Next I would try using QJackctl and start a Jack session. In the Jack session click on setup and set the interface to hw:USB it should show the Presonus. Once you do that and save the changes you may need to go into the patchbay and add the input and output.
I bought myself a Focusrite 2i2 3rd gen and extremely happy with the result.