


Network performance with VMXNET3 on Windows Server 2016

Introduction
In this post we will cover an updated version for addressing VMXNET3 performance issues on Windows Server 2016. As with an earlier post we addressed Windows Server 2012 R2 but, with 2016 more features were added and old settings are not all applicable.
What To Change
According to VMWare you may experience issues similar to:
- Poor performance
- Packet loss
- Network latency
- Slow data transfer
The issue may be caused by Windows TCP Stack offloading the usage of the network interface to the CPU.
To resolve this issue, disable the several features that are not supported by VMXNET3 driver.
First lets disable TCP chimney, Congestion Provider, Task Offloading and ECN Capability.
Open the command prompt as administrator and run these commands:
Update: in the past I have disabled Autotuning. A reader noted a recent update from Microsoft where disabling Autotuning can definitely limit Internet speeds, https://blogs.technet.microsoft.com/networking/2016/08/11/an-update-on-windows-tcp-autotuninglevel/. Setiing Autotuning to Normal will resolve the issue.
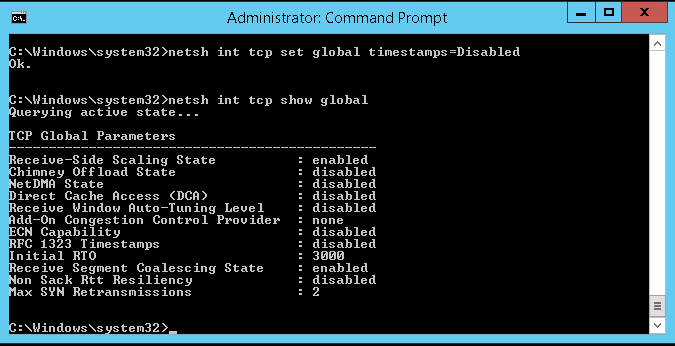
netsh int tcp set global chimney=Disabled
netsh int tcp set global autotuninglevel=normal
netsh int tcp set supplemental custom congestionprovider=none
netsh int tcp set global ecncapability=Disabled
netsh int ip set global taskoffload=disabled
netsh int tcp set global timestamps=Disabled
To validate type:
netsh int tcp show global
Next we will need to turn on RSS feature on the VMXNET3 driver. To do this open the network connections and adapter settings.
From GUI.
Open Control Panel > Network and Internet > Network Connections. Right click on your adapter and select properties.
Click on the Advanced tab and scroll down to find the Receive Side Scaling setting, you will see by default it is set to disabled. Set the drop down to enabled and click ok to save the settings.
Form the command line.
netsh int tcp set global RSS=Enable
There are some additional settings that will also cause performance issues. Here is what they are and how to make the needed changes.
Receive Segment Coalescing (RSC)
RSC is a stateless offload technology that helps reduce CPU utilization for network processing on the receive side by offloading tasks from the CPU to an RSC-capable network adapter. CPU saturation due to networking-related processing can limit server scalability. This problem in turn reduces the transaction rate, raw throughput, and efficiency.
This is similar to TCP Offloading issue and it is recommended to set this to disabled.
To disable RSC on the virtual machine, perform one of these options:
Use the PowerShell command Disable-NetAdapterRsc.
To disable for all interfaces:
Disable-NetAdapterRsc *
To disable for a specific interface:
Disable-NetAdapterRsc -Name Ethernetx
Disable RSC globally using the command line
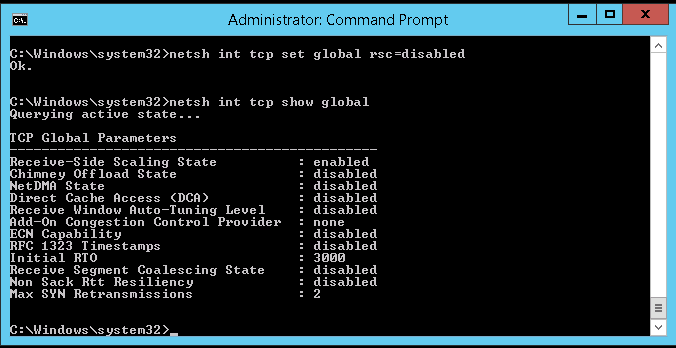
netsh int tcp set global rsc=disabled
From the GUI.
In the Network and Sharing Center of the guest operating system’s Control Panel, click the name of the network adapter.
A dialog box displays the status of the adapter.
Click Properties, and under the VMXNET3 network adapter type, click Configure.
On the Advanced tab, set both Recv Segment Coalescing (IPv4) and Recv Segment Coalescing (IPv6) to Enabled or Disabled.
Click OK.
To verify that RSC is disabled on the virtual machine:
Use the PoweShell command Get-NetAdapterRsc. The IPv4OperationalState and IPv6OperationalState should both be set to FALSE.
Use the netsh int tcp show global command. The Receive Segment Coalescing State should be set to disabled.
Reference:
Large Send Offload V2 (IPV4) & Large Send Offload V2 (IPV6)
Is a feature on modern Ethernet adapters that allows the TCP\IP network stack to build a large TCP message of up to 64KB in length before sending to the Ethernet adapter. Then the hardware on the Ethernet adapter — what I’ll call the LSO engine — segments it into smaller data packets (known as “frames” in Ethernet terminology) that can be sent over the wire. This is up to 1500 bytes for standard Ethernet frames and up to 9000 bytes for jumbo Ethernet frames. In return, this frees up the server CPU from having to handle segmenting large TCP messages into smaller packets that will fit inside the supported frame size.
Disable with PowerShell
Set-NetAdapterAdvancedProperty Ethernet -DisplayName "Large Send Offload V2 (IPv4)" -DisplayValue "Disabled" -NoRestart

Set-NetAdapterAdvancedProperty Ethernet -DisplayName "Large Send Offload V2 (IPv6)" -DisplayValue "Disabled" -NoRestart
From the GUI.
In the Network and Sharing Center on the Windows control panel, click the name of the network adapter.
Click its name.
A dialog box displays the status of the adapter.
Click Properties, and beneath the network adapter type, click Configure.
On the Advanced tab, set the Large Send Offload V2 (IPv4) and Large Send Offload V2 (IPv6) properties to Enabled or Disabled.
Click OK.
Restart the virtual machine.

Reference
TCP Segmentation Offload
TSO is used to offload packet processing from the CPU to the NIC. Disabled is the preferred setting.
From the GUI.
In the Network and Sharing Center on the Windows control panel, click the name of the network adapter.
Click its name.
A dialog box displays the status of the adapter.
Click Properties, and beneath the network adapter type, click Configure.
Click on the Advanced tab under the NIC properties and set the following attributes’ values to Disabled:
- IPv4 Checksum Offload
- IPv4 TSO Offload
- Large Send Offload V2 (IPV4)
- Large Send Offload V2 (IPV6)
- Offload IP Options
- Offload tagged traffic
- Offload TCP Options
- Recv Segment Coalescing(IPV4)
- Recv Segment Coalescing(IPV6)
- TCP Checksum Offload (IPv4)
- TCP Checksum Offload (IPv6)
- UDP Checksum Offload(IPv4)
- UDP Checksum Offload(IPv6)
Using PowerShell
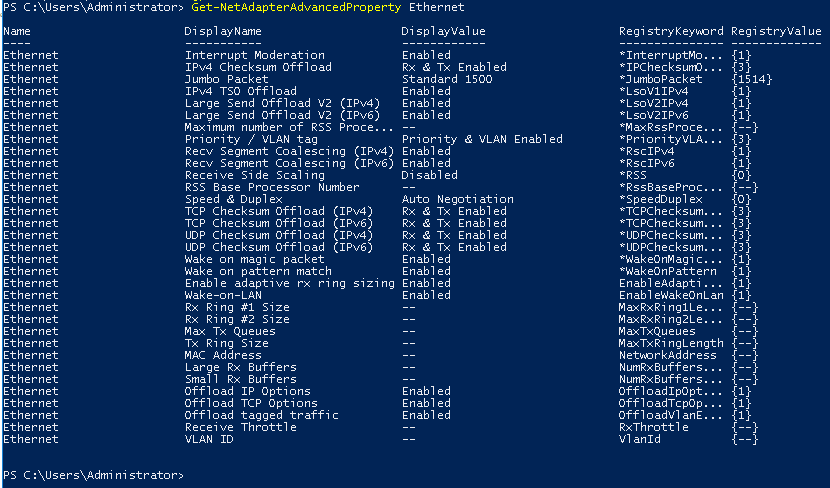
We can see the default settings before we change them with Get-NetAdapterAdvancedProperty Ethernet command.
Now we can set them using the following commands in PowerShell.
Set-NetAdapterAdvancedProperty Ethernet -DisplayName ” IPv4 Checksum Offload ” -DisplayValue “Disabled” -NoRestart
Set-NetAdapterAdvancedProperty Ethernet -DisplayName ” IPv4 TSO Offload ” -DisplayValue “Disabled” –NoRestart
Set-NetAdapterAdvancedProperty Ethernet -DisplayName “Large Send Offload V2 (IPv4)” -DisplayValue “Disabled” -NoRestart
Set-NetAdapterAdvancedProperty Ethernet -DisplayName “Large Send Offload V2 (IPv6)” -DisplayValue “Disabled” –NoRestart
Set-NetAdapterAdvancedProperty Ethernet -DisplayName ” Offload IP Options ” -DisplayValue “Disabled” -NoRestart
Set-NetAdapterAdvancedProperty Ethernet -DisplayName ” Offload tagged traffic ” -DisplayValue “Disabled” –NoRestart
Set-NetAdapterAdvancedProperty Ethernet -DisplayName ” Offload TCP Options ” -DisplayValue “Disabled” -NoRestart
Set-NetAdapterAdvancedProperty Ethernet -DisplayName ” Recv Segment Coalescing(IPV4)” -DisplayValue “Disabled” –NoRestart
Set-NetAdapterAdvancedProperty Ethernet -DisplayName ” Recv Segment Coalescing(IPV6)” -DisplayValue “Disabled” -NoRestart
Set-NetAdapterAdvancedProperty Ethernet -DisplayName ” TCP Checksum Offload (IPv4)” -DisplayValue “Disabled” –NoRestart
Set-NetAdapterAdvancedProperty Ethernet -DisplayName ” TCP Checksum Offload (IPv6)” -DisplayValue “Disabled” -NoRestart
Set-NetAdapterAdvancedProperty Ethernet -DisplayName ” UDP Checksum Offload(IPv4)” -DisplayValue “Disabled” –NoRestart
Set-NetAdapterAdvancedProperty Ethernet -DisplayName ” UDP Checksum Offload(IPv6)” -DisplayValue “Disabled” -NoRestart
See results using Get-NetAdapterAdvancedProperty Ethernet
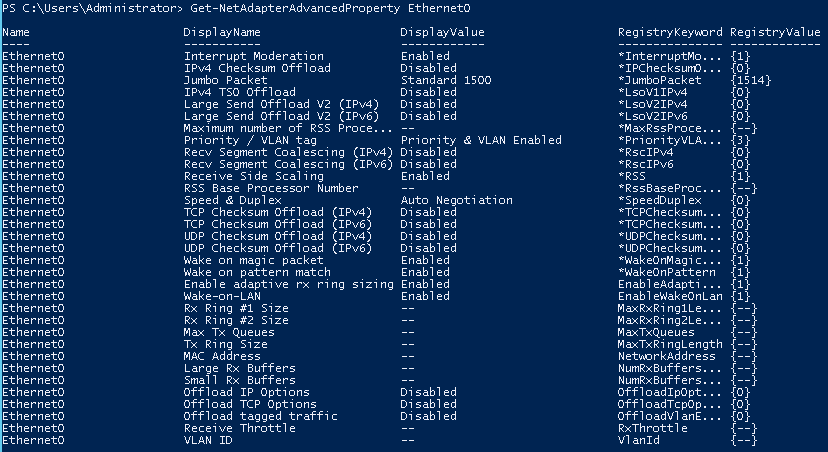
Reboot your system for the changes to go into effect.
Power plan
To ensure that the system takes advantage of the available resources, it is important to disable all power saving features while investigating performance issues. If the power saving configuration appears to be related to the performance problems, a customized power plan based on the performance and power saving requirements should be created. If you are unsure about which power saving configuration is recommended for your system, engage your hardware vendor.
To adjust the power plan settings on a Windows 2016 Server:
Click Start, type powercfg.cpl, and press Enter.
Ensure that the High performance option is selected.
Note: The Steps are optional.
Click Change plan settings.
Click Change advanced power settings.
To enable access to all settings, click Change settings that are currently unavailable.
Browse the available settings and adjust as necessary.
Click OK to confirm and close all windows.
References
Conclusion
There are several more options available to address performance issues with Windows Server 2016 using VMXNET3 drivers from Windows Server 2012 R2 that we have covered in this post. Changing these settings should help address many of these issues.


These settings have destroyed my throughput. And no matter what I do I cannot restore the defaults to get my connection fast again.
Could you please give the commands to reset to default?
Thanks
Matt
Matt, Sorry that the settings have destroyed your throughput, not seen that happen before but it is possible depending on how your environment is setup. The commands to reset will take me a bit to get together, there are many settings, but I’ll see what I can do. Question, Are you running IPV6 in your environment? If not, you should disable IPV6 in you NIC settings I have seen it cause issues with network.
Matt, Run these commands to reset back to defaults, reboot after running.
Command Line
netsh int tcp set global chimney=Disabled
netsh int tcp set global autotuninglevel=Normal
netsh int tcp set supplemental custom congestionprovider=none
netsh int tcp set global ecncapability=Enabled
netsh int ip set global taskoffload=disabled
netsh int tcp set global timestamps=Disabled
PowerShell
Set-NetAdapterAdvancedProperty Ethernet -DisplayName “Large Send Offload V2 (IPv4)” -DisplayValue “Enabled” -NoRestart
Set-NetAdapterAdvancedProperty Ethernet -DisplayName “Large Send Offload V2 (IPv6)” -DisplayValue “Enabled” -NoRestart
Set-NetAdapterAdvancedProperty Ethernet -DisplayName ” IPv4 Checksum Offload ” -DisplayValue “Enabled” -NoRestart
Set-NetAdapterAdvancedProperty Ethernet -DisplayName ” IPv4 TSO Offload ” -DisplayValue “Enabled” –NoRestart
Set-NetAdapterAdvancedProperty Ethernet -DisplayName “Large Send Offload V2 (IPv4)” -DisplayValue “Enabled” -NoRestart
Set-NetAdapterAdvancedProperty Ethernet -DisplayName “Large Send Offload V2 (IPv6)” -DisplayValue “Enabled” –NoRestart
Set-NetAdapterAdvancedProperty Ethernet -DisplayName ” Offload IP Options ” -DisplayValue “Enabled” -NoRestart
Set-NetAdapterAdvancedProperty Ethernet -DisplayName ” Offload tagged traffic ” -DisplayValue “Enabled” –NoRestart
Set-NetAdapterAdvancedProperty Ethernet -DisplayName ” Offload TCP Options ” -DisplayValue “Enabled” -NoRestart
Set-NetAdapterAdvancedProperty Ethernet -DisplayName ” Recv Segment Coalescing(IPV4)” -DisplayValue “Enabled” –NoRestart
Set-NetAdapterAdvancedProperty Ethernet -DisplayName ” Recv Segment Coalescing(IPV6)” -DisplayValue “Enabled” -NoRestart
Set-NetAdapterAdvancedProperty Ethernet -DisplayName ” TCP Checksum Offload (IPv4)” -DisplayValue “Enabled” –NoRestart
Set-NetAdapterAdvancedProperty Ethernet -DisplayName ” TCP Checksum Offload (IPv6)” -DisplayValue “Enabled” -NoRestart
Set-NetAdapterAdvancedProperty Ethernet -DisplayName ” UDP Checksum Offload(IPv4)” -DisplayValue “Enabled” –NoRestart
Set-NetAdapterAdvancedProperty Ethernet -DisplayName ” UDP Checksum Offload(IPv6)” -DisplayValue “Enabled” -NoRestart
these settings also had a severe negative impact on my system as well.
Sorry to hear that, Can you tell me which ones affected your performance?
If you set auto tuning back to Normal for 2012R2 it might sort the issue
netsh int tcp set global autotuninglevel=normal
https://blogs.technet.microsoft.com/networking/2016/08/11/an-update-on-windows-tcp-autotuninglevel/
Hello. The following command does not work on 2016.
netsh int tcp set supplemental custom congestionprovider=none
Can you provide the correct command?
netsh int tcp set global autotuninglevel=normal
But picture says =disabled
(used the picture from 2012R2?)
The picture was snapped prior to running the command, thought I got those out of there before publishing.
netsh int tcp set supplemental custom congestionprovider=none
This command has been depreciated and will no longer work.
Hello, according to the following VMware links, it says to verify Windows’ RSC (aka Large Receive Offload) is enabled globally for Win2012R2 and higher for VMXNET3 on vSphere 6.0:
https://blogs.vmware.com/performance/2015/06/vmxnet3-lro.html
https://docs.vmware.com/en/VMware-vSphere/6.0/com.vmware.vsphere.networking.doc/GUID-ECC80415-442C-44E9-BA7A-852DDB174B9F.html
https://www.vmware.com/content/dam/digitalmarketing/vmware/en/pdf/techpaper/vmware-perfbest-practices-vsphere6-0-white-paper.pdf
I’m curious as to your thoughts on how this works in practice. Thanks.
Hello, i’m running in the same problem with windows server 2016 on vmware 6.0.
iperf on default installation:
[ ID] Interval Transfer Bandwidth
[212] 0.0-60.5 sec 1.83 GBytes 260 Mbits/sec
iperf after your setting:
[ ID] Interval Transfer Bandwidth
[212] 0.0-60.0 sec 42.0 GBytes 6.02 Gbits/sec
Great, thanks a lot.
Hello,
We are running Windows Server 2016 on VMWare 6.0 and running into slow JDE 9.2 Build times of 4-6 hours some times days, your settings have now resolved our issues and build times are now 1-2 hours. Much Appreciated for this article.
I am glad was able to help you out.
I’ve done a fair amount of research today and have some questions/updates.
netsh int tcp set global chimney=Disabled – This one seems unnecessary since this is disabled by default on 2012 server on out. I didn’t find an official Microsoft document on this, but I did come across this discussing it. http://www.58support.nec.co.jp/global/download/Tech/snp.html
What are the reasons behind these settings?
netsh int tcp set global autotuninglevel=normal
netsh int tcp set supplemental custom congestionprovider=none
netsh int tcp set global ecncapability=Disabled
netsh int ip set global taskoffload=disabled
netsh int tcp set global timestamps=Disabled
RSS is now enabled by default on any vNIC created beyond VMWare Tools 10.2.5. It has to be a net new vNIC and not one that existed prior to driver or VMware Tools updates.
https://docs.vmware.com/en/VMware-Tools/10.2/rn/vmware-tools-1025-release-notes.html
RSC problems seemed to be fixed in ESXi 6.0 U2. And there are potential problems with leaving RSC on and setting the various offloads to disabled. So I guess it’s debatable on if you should disable RSC + all offloading vs leaving RSC on with all offloading enabled, but no hybrid there. So I guess I’d like to understand the why more behind turning off all the offloading options.
https://kb.vmware.com/s/article/2129176
https://kb.vmware.com/s/article/57358
The issue still exists in 6.5. This article is spot on.
For folks that want to reset everything, try this:
netsh int tcp reset global