How To Setup a DDNS enabled Router Through Double NAT
Recently my ISP upgraded my trusty Cisco 675 to a Westell 6100 due to an upgrade of my service. It was shortly afterwards I noticed I could no longer access my Linux server using DynDNS. Nothing had changed with my account and settings on both ends. Upon investigating I noticed my ISP DNS had changed from a routable 10.x.x.x address to a non-routable 192.168.x.x.
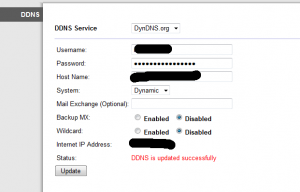
After searching the Internet and checking nd changing settings I found that nothing worked. Port forwarding was set, firewalls godd but all to no avail. That’s when I noticed a feature on the Cisco Linksys E4200 router under Setup > DDNS and saw an entry in the drop down for DynDNS.
First selected DynDNS.org from the drop down and entered in my username, password and DynDNS hostname and left the other settings as is. Clicked update, Save Settings and waited 10 or so minutes and tried accessing my system and what do you know, success.
This will only work for one DynDNS hostname you have defined. If you have multiple then you will need to change the one you want to access in the router setting.
Also, this is for a Cisco Linksys E4200 but this feature is available on many other manufacturer’s routers as well and the same principle can be applied. The key items to remember are:
- username and password for DynDNS
- DynDNS hostname
- Enable Port Forwarding for the system in your router
- Have a DynDNS compatible client installed on the host.
- DDNS capable router
Hope this helps you to get past the nasty Double NAT issue as it did for me.


This is useful. I have to try this on my 1900 linksys.I have an Openwrt and was struggling. Was not aware that DYNDNS supports this. Thanks much!