Installing OCS Inventory NG Part 1
With a small office and on a budget needed to find a way to manage our amassing computer equipment. Enter in OCS Inventory NG (Open Computer and Software Inventory Next Generation)
OCS Inventory NG is an application designed to help a network or system administrator keep track of the computers configuration and software that are installed on the network. OCS Inventory is also able to detect all active devices on your network, such as switch, router, network printer and unattended devices. As a bonus, it also includes package deployment and is expandable for the Enterprise.
Some of the many features are:
- Powerful deployment system allowing to distribute software installation or scripts on computers without overloading the network.
Web Administration Console - Multiple operating systems support, including Microsoft Windows, Linux, *BSD, Sun Solaris, IBM AIX, HP-UX, MacOS X.
- 3-Tier architecture using current standards, HTTP/HTTPS protocol and XML data formatting.
- Web service accessible through SOAP interface.
- Plugins support through API.
- Network scan
- Synchronization with GLPI
For our network we will be installing OCS Inventory NG on a RHEL 6 server and agents installed on Windows and Linux servers and several NAS and Network devices to be discovered. Since we have a small network a single OCS Management server is all we will require to handle the duties.
The current version at the time of writing is 2.01 and there are several pieces to install. The main part on the server is OCS Inventory NG Server, the OCS Inventory NG Agents and OCS Inventory NG Tools. All can be downloaded from OCS Inventory NG Downloads page.
Install OCS Inventory NG Server
First step is to install OCS Inventory NG Server. There are 4 parts to the server which are Database Server (MySQL), Communication server, Administration console and Deployment server. All 4 components can be hosted on the same server or split onto separate servers, for our installation we are installing all 4 components on one server.
OCS Inventory NG Server requirements are:
- Apache version 1.3.33 or higher / Apache version 2.0.46 or higher.
- Mod_perl version 1.29 or higher.
- Mod_php version 4.3.2 or higher.
- PHP 4.3.2 or higher, with ZIP and GD support enabled.
- PERL 5.6 or higher.
- Perl module XML::Simple version 2.12 or higher.
- Perl module Compress::Zlib version 1.33 or higher.
- Perl module DBI version 1.40 or higher.
- Perl module DBD::Mysql version 2.9004 or higher.
- Perl module Apache::DBI version 0.93 or higher.
- Perl module Net::IP version 1.21 or higher.
- Perl module SOAP::Lite version 0.66 or higher (optional)
- MySQL version 4.1.0 or higher with InnoDB engine active.
- Make utility such as GNU make.
During the installation OCS will check and prompt if it sees any requirements missing.
Now we need to install the requirements in which some of the requirements will need EPEL repository available for installation. Follow the link to install and update your repos.
Now that we have our repositories in order we can install the Perl modules and packages needed. First install communication server required Perl modules.
$ sudo yum install perl-XML-Simple perl-Compress-Zlib perl-DBI perl-DBD-MySQL perl-Apache-DBI perl-Net-IP perl-SOAP-Lite mod_perl
Any dependencies will be installed after running the command.
Next piece is to install the Administration console required PHP modules.
$ sudo yum install –y php-common php-gd
Now lets start the installation of OCS Inventory NG Server module.
Move the downloaded tar file to directory you want it to live, I have chosen /opt and un-tar it.
$ sudo cp OCSNG_UNIX_SERVER-2.0.1.tar.gz /opt/
$ cd /opt
$ sudo tar –xvzf OCSNG_UNIX_SERVER-2.0.1.tar.gz
$ cd OCSNG_UNIX_SERVER-2.0.1
Time to fire off the installation.
$sudo sh setup.sh
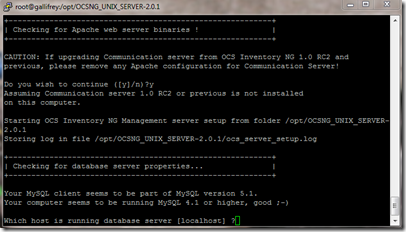
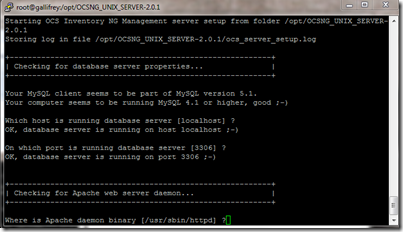
Type “y” or “enter” to validate and then enter in the MySQL server properties. If all is ok then enter in the MySQL port 3306, which is the default and press enter.
Enter in or validate the path to the Apache daemon binary, which is usually /usr/sbin/httpd.
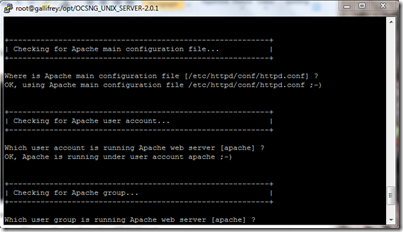
Enter or validate the path to the Apache main configuration file, usually /etc/httpd/conf/httpd.conf
Enter or validate the Apache daemon running user account, which is apache for RedHat.
Enter in or validate the Apache include configuration directory, normally /etc/httpd/conf.d. Enter in or validate the location of Perl binaries, usually /usr/bin/perl.
Next the installation will attempt to determine the version of mod_perl running on the system. If installed it will move ahead, if there are multiple then it will ask what version you have, make the correct selection and move along. Next the installation will ask you where you want to store the debugging/tuning logs. Press enter to select the defaults. If all is ok, setup will install Communication Server.
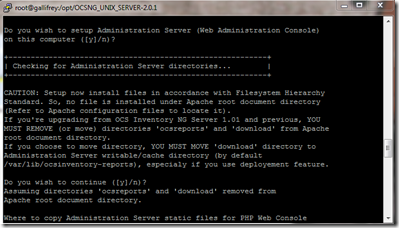
Communicator server will complete and you will be prompted to install Administration console. Answer yes to proceed.
You will be prompted for location to install the PHP web console files and complete the installation.
Restart apache
$ sudo /etc/init.d/httpd restart
Configuring Communication server
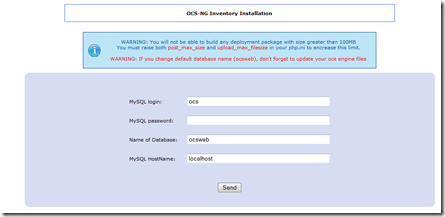
Open a browser and go to http://localhost/ocsreports/install.php. This will open up the Administration server and ask for database connection properties for creating the MySQL database.
- Fill in information to connect to MySQL database server with a user who has the ability to create database, tables, indexes, etc (usually root):
MySQL user name
MySQL user password
MySQL hostname
Setup actions :
- Create ocsweb database, and will add MySQL user ocs with password ocs.
- Grant to user ocs privileges Select | Insert | Update | Delete | Create | Drop | References | Index | Alter | Create temp | Lock on database ocsweb.
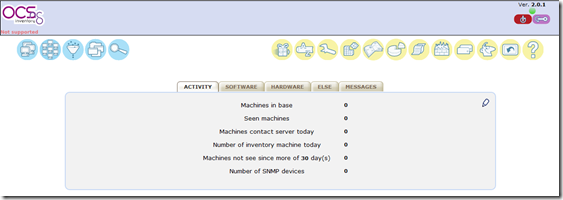
Setup is now complete and you can login to http://localhost/ocsreports as user id admin and password admin. Once logged in change the password on the users section. You will also see a warning stating install.php exists in your installation directory. Rename or delete /usr/share/ocsinventory-reports/ocsreports/install.php.
You will also see a warning to change the password for the ocs user created during the database configuration portion. Connect to your mysql instance and change the password for ocs user.
$ mysql –u root –p
mysql> set password for ‘ocs’@’localhost’ = PASSWORD(‘newpass’);
mysql> set password for ‘ocs’@’%’ = PASSWORD(‘newpass’);
Next the need to update the ocs user password in the database connection files. The first is the /usr/share/ocsinventory-reports/ocsreports/dbconfig.inc.php. Chane the define(“PSWD_BASE”,”ocs”); line and save the file
Also need to change the PerlSetVar OCS_DB_PWD line in the /etc/httpd/conf.d/z-ocsinventory-server.conf file. Once the changes are completed restart apache. We now have a working installation.
Be looking for part 2 of the series where we will cover installing the Agents for Windows and Linux!!!
10 Responses to “Installing OCS Inventory NG Part 1”
Trackbacks/Pingbacks
- Ocs Inventory Website - logininfos.com - […] » Visit Now Oct 01, 2011 · With a small office and on a budget needed to find a way…





More coming, this is only part 1 on OCS Inventory. Have many other parts covering agents and various settings and integration with GLPI and Nagios on the way.
What other items would you like to see on OCS Inventory NG? The first part was basically to get it installed, not alot more detail can be put into it unless you are wanting to see a multi-tiered setup. I do plan on covering reporting, package deployment and other features of OCS Inventory NG.
I would like to see more detail on the installation. I am currently trying to install server v2 to a Windows 2008R2 server. I get the http://localhost/ocsreports/install.php in French and not English. When I fill in the details to match your information and send it I get a:
ERROR: ce compte MySQL n’a pas les droits de création de database
The documentation on the Wiki gives very little info if not using Linux. I did a complete install using the packaged version with XAMPP.
What am I missing?
Jim,
I will see what I can do for you and installing it in Windows, give me a little time. The error seems like it doesn’t have the correct MySQL access or MySQL ismissing on the system.
Thank you for the article. This has me much closer to getting this working that I would have been otherwise.
After I add the EPEL repo, I still get the following errors when trying to install the perl modules:
No package perl-XML-Simple available.
No package perl-Net-IP available.
No package perl-SOAP-Lite available.
I’ve added the ius repo also, and yum still does not find those. Am I crazy or just missing something simple? (It’s got to be one of those two.)
Thanks!
Alan,
All 3 of the perl rpm’s are provided by the standard Redhat, or CentOS or Scientific Linux repositories. That are set at installation You can search for the package with yum
sudo yum search perl-XML-Simple and if found you will get a list. You can also use provides switch and find the repo it is part of.
Example:
$ sudo yum search perl-XML-Simple
$ sudo yum provides perl-XML-Simple
What distribution are you running and the release? Hope this helps more to get you to a running installation.
Thanks! I’m looking into it again. (I’ve been distracted with other things…) I’m actually using the UNC system’s repo, so I’ll check with the maintainer of that.
Oops. RHEL 6.2. I suppose I could add one of the other repos, couldn’t I?
If you are using UNC’s repo then they would probably need to sync it up. The rpm’s are part of the standard RHEL repository.
The system was not subscribed to the ‘optional’ channel… They are there now. Thanks for your help!