


How To Uninstall Windows 10 and Downgrade to Windows 7
Introduction
So you have installed Windows 10 and it is just not your thing, or printers scanners or even the PC itself is not working after the upgrade. As long as you’ve upgraded within the last month, you can uninstall Windows 10 and downgrade your PC back to its original Windows 7 or Windows 8.1 operating system. Even if it’s been more than a month, you should be able to reinstall the version of Windows that came with your PC using fresh installation media and its product key.
The Process
If you’ve upgraded a PC to Windows 10 , not performed a clean install, but an upgrade, you’ll have an easy option that lets you revert to the last version of Windows. To access this, open the Start menu and select Settings. Click the “Update & security” icon and select “Recovery.”
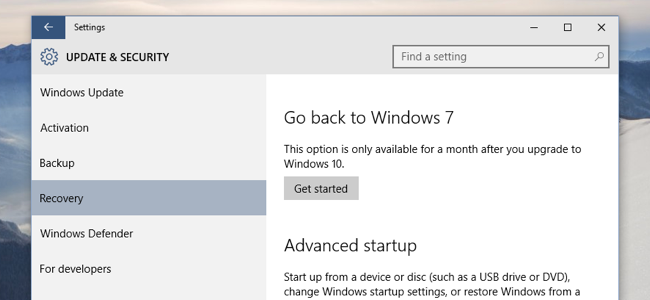
You should see a “Go back to Windows 7” or “Go back to Windows 8.1” option. Click the Get started button to get rid of your Windows 10 install and restore your previous Windows install. Microsoft will ask you why you want to go back.
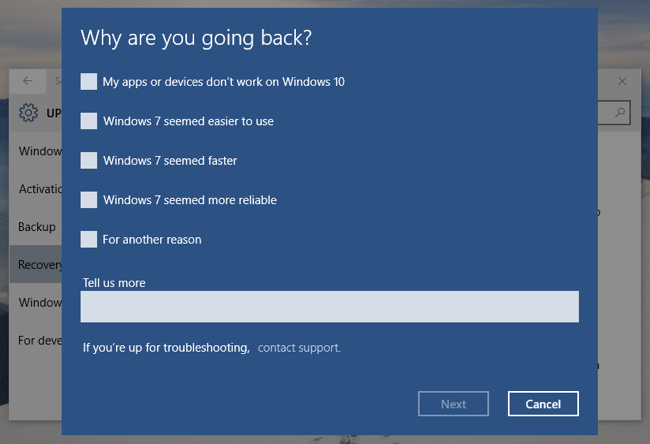
If it’s been over a month, or if you’ve run the Disk Cleanup tool and removed the “Previous Windows installations” files or deleted the C:\Windows.old folder by hand, you’ll no longer see this option. Windows 10 appears to automatically remove the old Windows installation files after a month to free up space. Select a reason and click Next.
Just sit back and wait for the recovery process to complete. Once done you will be presented with the version of Windows you had before the upgrade.


Leave a Reply